February 24, 2009

It Starts With The Histogram

        Understanding digital photography starts with the exposure. If you compare it to exposing film, it is more like transparency film than negative film. To get the best dynamic range from a digital exposure, you must expose it as bright as possible without over exposing the image. There is a fine line in finding that perfect place. Many photographers play it safe and stay on the lower side of the perfect exposure. Pro photographers know not to overexpose, but getting that perfect spot on the verge of overexposure is where the beauty lies in digital Imaging. To find that perfect place you must master the art of previsualization and reading of the histogram.


        In the days of film, we could always count on the Polaroid to double check the exposure. Learning to read the Polaroid exposure and evaluate the results to adjust the film exposure was very important if you want consistent results without bracketing all over the place to get the final image. The photo on the LCD viewer of our camera is not a modern day equivalent of the Polaroid. You must learn to look at the scene and understand where the exposure should be to create the perfect rendering of the image. Remember, there is no such thing as a good or bad histogram. There can only be a good or bad rendering of the file. Think of the histogram as a bar chart with 256 separate bars. How high any one bar rises depends how many times any pixel value appears in the image.
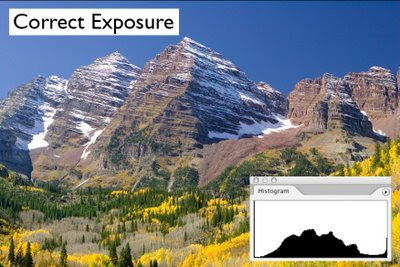
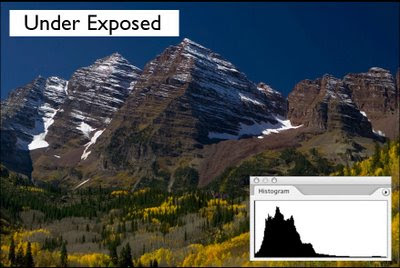
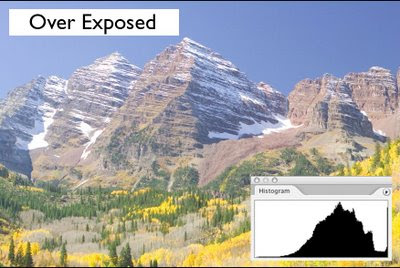
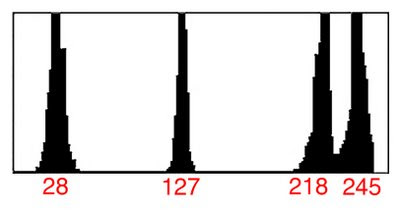
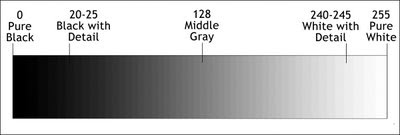
       When determining the proper exposure for the final 8 bit file, you will find that on a scale of 0-255, white with detail is at about 240-245. Above that, white will start to loose any true detail as it approaches pure white of 255. On the shadow side, black with detail lives at about 20-25. Below 20 and you start to loose you shadow detail. This does not mean you can't have a pure black of 0, or a pure white of 255 in you image. It just means you need to be aware of where these values fall to hold detail in the areas that really need it. Just remember to expose for the highlights, and process for the shadows.

        By shooting Raw files you will have incredible control over the tonal range of the image. Buy letting the camera process it’s Raw data into jpeg files, you lose all this control. You spend a lot of cash for these incredible cameras, and not want the best possible quality? That’s just plain crazy….

February 12, 2009

Custom White Balance and Exposure

          There’s something that really drives me crazy with digital photography and Photoshop. Why is there so much emphasis on color correction? When did we all become such bad photographers where we have to spend so much time correcting color instead of shooting an image properly to start with? Want life to be better? I have three words for you today… Auto Is Evil… Now, three words that will make everything a lot better…. Custom White Balance…. Doing a custom white balance at the start of a photo shoot will save so much time on the computer that you will actually find time to be creative again, instead of being a color correcting technician…. I have worked with several different color charts over my 30 years in professional photography, and the one that I have found that works better than any other is the Photo Master Target developed by my good friend Jean-Francois O'Kane. I am not saying it because he is my friend… I didn’t even know him before discovering this tool that is part of my everyday workflow in or out of he studio. I met J F while Helene and I were teaching a weeklong workshop at the Niagara School in Canada. At first glance, it might seem like other targets you may have used before, but it’s not … Using this target has saved so much time for both Helene’s portrait photography and my commercial images in the studio and on location. Here’s how it works….
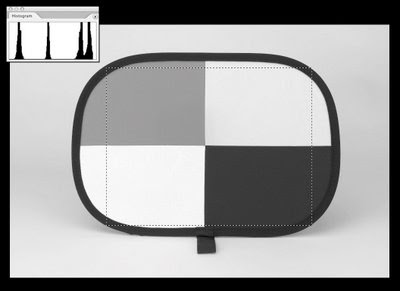
          The target has 4 patches of very neutral tones. They are created to give you a nice middle gray, and black with detail, a white with detail, and a forth tone of white that is slightly darker the white with detail patch.

        When starting a new photo shoot, you set the custom white balance by shooting a reflective image filling the frame with the middle gray patch, or shooing through the semi translucent white patch for an incident reading.
         Once the white balance is set, you then photograph the entire target filling the camera frame with all 4 patches that will give you a very unique histogram. What you are looking for is 4-peek histograms that will help you determine the proper highlight contrast. If you can get the two lighter peeks to have slight separation between them, you will have proper highlight contrast and exposure.

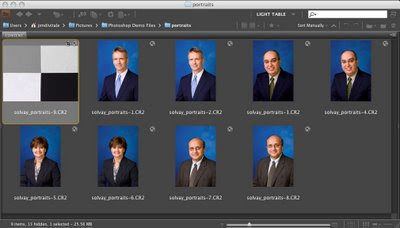
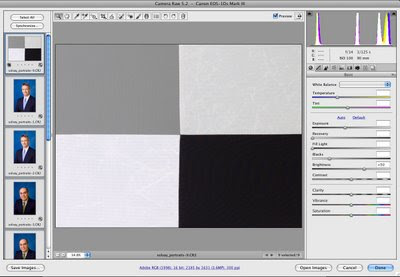
          When working with a group of images that are shot under the same lighting situation, you can open all of them up in Adobe Camera Raw or Lightroom and enhance the tonal range to all of them at once by adjusting the histogram of the target and applying the enhancement to all the files at once. This will save a great deal of processing time and help with consistency between all the files on the shoot. You can find out more information on the Photo Master Target at www.photomastertarget.com. You can use the discount code 68VT284 that J F has provided for all my readers. You won’t be disappointed.