April 02, 2009

Photoshop World Boston 2009


        Helene and I are back from Photoshop World #20. Hard to believe we have had 20 of them already. Attendance was a little down from others due to the tight economy, but it still was a busy show. I had all new programs this year and some that I had never done on stage before. Since I didn’t have a pre-con class this show, I helped Kevin Ames with his class running the computer for the live shoot everyone enjoyed seeing how make-up, prop-styling, and fashion photography all comes together at once. The theme this year is football, and we had some great moments of football fun at the opening keynote. Things moved pretty smoothly through the entire show. I taught a class on Photo Illustration for Advertising, Still Life Live Shoot, Creating the Perfect Panoramic Image, and Working with your Digital Photographer. Helene ran the portfolio review and taught a live shooting class on digital portraits. Then she taught her creativity class to a packed house in the trade show theater. On Thursday night I hosted the Art of Digital Photography panel where I share the stage with Jay Maisel, John Paul Caponigro, Joe Glyda and others to show a 15-minute presentation of my artwork. Always a lot of fun!
        Spent a bunch of time in the three story Apple store across the street from the conference center. They had the coolest glass spiral staircase… Took lots of pictures with my little Canon 870 to make some new montage abstract images.

         On Saturday Mark Maio and I had our first day long seminar under our new flag of The Digital Imaging Institute for Science and Medicine. We made or presentation to Boston area attendees at the Joslin Diabetes Center. We felt it went very well and got lots of great feedback to make each one we do better and better. Our next presentation will be in Atlanta at the Emory Eye Center on April 18th. Please feel free to pass along this info to any of your friends that have anything to do in the medical or scientific side of digital imaging.

        I had my first print competition at the state convention as a new member of the Professional Photographers of California this past month. I haven’t done one in a long time. Judging was pretty tough as they have very good photographers across the state. I was pleased to find in my returned case that I won EI Commercial Photographer of the Year and EI Illustrative Photographer of the Year. I have several different competitions I am working on now both for photography, and for the design of my new 20-page studio brochure that designer Mile Leidel of Steem created for me. (see the side bar link if you would like to download a copy of it) I am finally getting caught up at the studio so I can have time now to get another tutorial up...  I am working on new articles for Photoshop User and Professional Photographer magazine. Watch for those soon....   

March 31, 2009

Hands-On Digital Photography Workshop In Our Atlanta Studio

It's time once again for the Divitale/Glassman hands-on workshop held in our Atlanta Studio hosted by Software Cinema. Helene and I are looking forward to three days of in-depth digital photography training and would love to have you join us. For more information, please visit the software Cinema website link at http://www.software-cinema.com/page/6/jd_hg_09


March 15, 2009

Mark Maio and Jim DiVitale announce the start of the Digital Imaging Institute for Science and Medicine

To help bring digital imaging training into the medical areas, photographer Mark Maio has created the Digital Imaging Institute for Science and Medicine. As President and CEO of this new association, Mark has appointed me Director of Education. Mark and I have been working on these plans for a long time as we create our outline to help get the medical and scientific users up and running on the latest imaging techniques and Photoshop CS4 Extended. This expanded version of Photoshop has many additional features that are designed for the forensic, medical and scientific research side of digital imaging. From basic digital capture through specific area applications, we plan to provide a place for ongoing training through the web, seminars, hands-on workshops, and training DVD’s. Our first official daylong seminar is in two weeks in Boston right after Photoshop world. Information can be found on our new web site  http://www.digitalimaginginstitute.com.


Mark and I have been friends for over 25 years. We started out as instructors together at the Art Institute of Atlanta in the eighties. Both photography and education has been a big part of our lives. Mark is both a world-class medical photographer and consultant specializing in ophthalmic imaging, as well as an established fine art photographer with a permanent collection of work in the George Eastman House. I am very excited about the opportunity to help coordinate the training efforts for this new association as it starts out. Adobe is very excited to see where this can go as we start off small, by have really big ideas for it’s future. If you, or have any friends in the medical or scientific side that you feel would benefit form this type of association, please send us an e-mail through the web site.
I have been on the road teaching a lot this past month with programs in Atlanta and Raleigh NC. This coming week I have a Canon Explorers of Light program this Thursday for ASMP held at PPR Atlanta, and another 2-day Canon sponsored program in Chattanooga. Then it is off to Boston for Photoshop World and our medical seminar. Back in the studio we have been very busy shooting our Mizuno Baseball catalog for 2010. 
Helene has been very busy with multiple photographic projects in Santa Barbara. This weekend, she taught her “An Outlet For My Creative Self “ two-day workshop at Lepp Institute. Students learned all types of creative imaging techniques as well as solid business marketing applications. These are all good tune-ups for both of us as we approach Photoshop World in Boston. Working with Scott Kelby and his staff is certainly the best teaching experience we have all year. I have some new classes I have never taught before and I am looking forward to an exciting conference as usual. If you have never been to a Photoshop World, you should really make plans to attend one in the future. I will get a new imaging tutorial posted as soon as I can this week…


February 24, 2009

It Starts With The Histogram

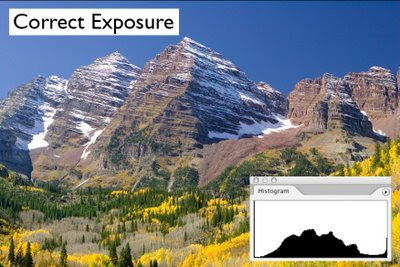
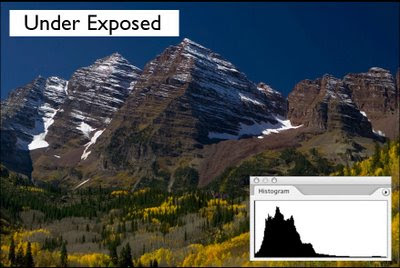
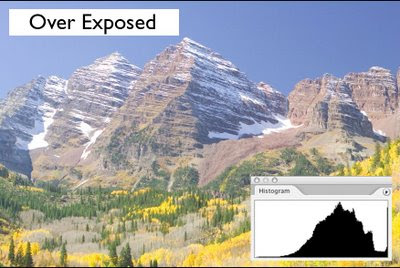
        Understanding digital photography starts with the exposure. If you compare it to exposing film, it is more like transparency film than negative film. To get the best dynamic range from a digital exposure, you must expose it as bright as possible without over exposing the image. There is a fine line in finding that perfect place. Many photographers play it safe and stay on the lower side of the perfect exposure. Pro photographers know not to overexpose, but getting that perfect spot on the verge of overexposure is where the beauty lies in digital Imaging. To find that perfect place you must master the art of previsualization and reading of the histogram.


        In the days of film, we could always count on the Polaroid to double check the exposure. Learning to read the Polaroid exposure and evaluate the results to adjust the film exposure was very important if you want consistent results without bracketing all over the place to get the final image. The photo on the LCD viewer of our camera is not a modern day equivalent of the Polaroid. You must learn to look at the scene and understand where the exposure should be to create the perfect rendering of the image. Remember, there is no such thing as a good or bad histogram. There can only be a good or bad rendering of the file. Think of the histogram as a bar chart with 256 separate bars. How high any one bar rises depends how many times any pixel value appears in the image.


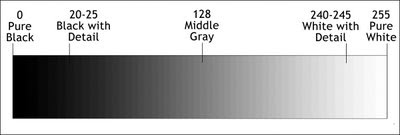
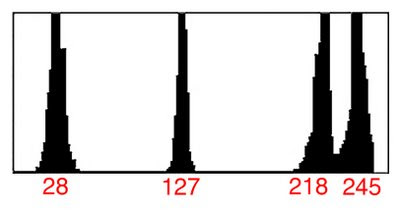
       When determining the proper exposure for the final 8 bit file, you will find that on a scale of 0-255, white with detail is at about 240-245. Above that, white will start to loose any true detail as it approaches pure white of 255. On the shadow side, black with detail lives at about 20-25. Below 20 and you start to loose you shadow detail. This does not mean you can't have a pure black of 0, or a pure white of 255 in you image. It just means you need to be aware of where these values fall to hold detail in the areas that really need it. Just remember to expose for the highlights, and process for the shadows.


        By shooting Raw files you will have incredible control over the tonal range of the image. Buy letting the camera process it’s Raw data into jpeg files, you lose all this control. You spend a lot of cash for these incredible cameras, and not want the best possible quality? That’s just plain crazy….

February 12, 2009

Custom White Balance and Exposure

          There’s something that really drives me crazy with digital photography and Photoshop. Why is there so much emphasis on color correction? When did we all become such bad photographers where we have to spend so much time correcting color instead of shooting an image properly to start with? Want life to be better? I have three words for you today… Auto Is Evil… Now, three words that will make everything a lot better…. Custom White Balance…. Doing a custom white balance at the start of a photo shoot will save so much time on the computer that you will actually find time to be creative again, instead of being a color correcting technician…. I have worked with several different color charts over my 30 years in professional photography, and the one that I have found that works better than any other is the Photo Master Target developed by my good friend Jean-Francois O'Kane. I am not saying it because he is my friend… I didn’t even know him before discovering this tool that is part of my everyday workflow in or out of he studio. I met J F while Helene and I were teaching a weeklong workshop at the Niagara School in Canada. At first glance, it might seem like other targets you may have used before, but it’s not … Using this target has saved so much time for both Helene’s portrait photography and my commercial images in the studio and on location. Here’s how it works….
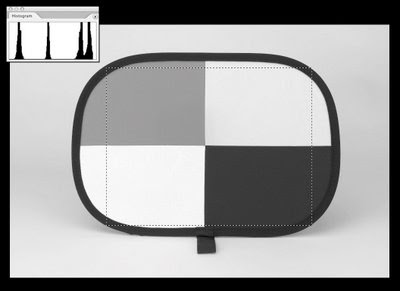
          The target has 4 patches of very neutral tones. They are created to give you a nice middle gray, and black with detail, a white with detail, and a forth tone of white that is slightly darker the white with detail patch.

        When starting a new photo shoot, you set the custom white balance by shooting a reflective image filling the frame with the middle gray patch, or shooing through the semi translucent white patch for an incident reading.
         Once the white balance is set, you then photograph the entire target filling the camera frame with all 4 patches that will give you a very unique histogram. What you are looking for is 4-peek histograms that will help you determine the proper highlight contrast. If you can get the two lighter peeks to have slight separation between them, you will have proper highlight contrast and exposure.

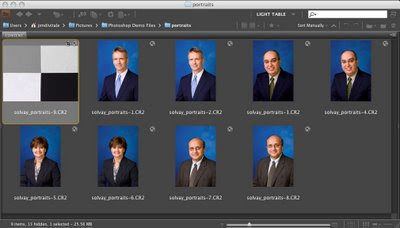
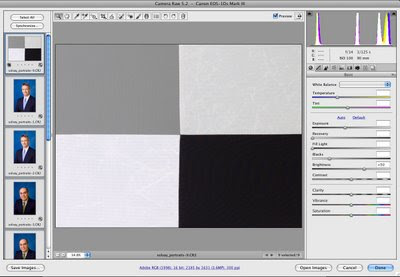
          When working with a group of images that are shot under the same lighting situation, you can open all of them up in Adobe Camera Raw or Lightroom and enhance the tonal range to all of them at once by adjusting the histogram of the target and applying the enhancement to all the files at once. This will save a great deal of processing time and help with consistency between all the files on the shoot. You can find out more information on the Photo Master Target at www.photomastertarget.com. You can use the discount code 68VT284 that J F has provided for all my readers. You won’t be disappointed.