
Times have changed for the better. Finally, we have a way to custom profile the camera quickly for all the different lighting conditions we shoot under and it is as simple as it could possible be…. and it works! The new ColorChecker Passport from X-Rite is the best thing to come to color management since the availability of the affordable colorimeter. We can now quickly take a shot of the ColorChecker Passport under the lighting conditions of the photo shoot and custom profile the target to get the predictable and repeatable results we have been looking for with a single click. This whole process can be completed faster than it took to read the last couple of lines of this blog post. Here’s how it works….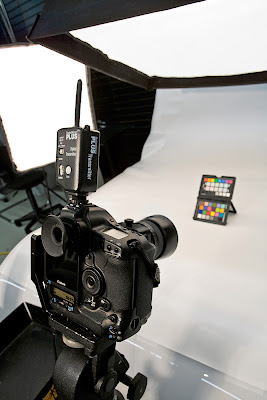 Step one: First thing you need the X-Rite Color Checker Passport… It’s a $99 product you can buy at your local professional camera store. It comes with a CD that includes the profiling software to create a custom profile to be used in Adobe Photoshop and Lightroom. You start by shooting a photograph of the ColorChecker Passport target. Light the target evenly, have the white balance of the camera set for the type of lighting you are shooting, and try to get the best exposure you can of the target when making the exposure. Doing a custom white balance is unnecessary at this time, as the software will just ignore it anyway.
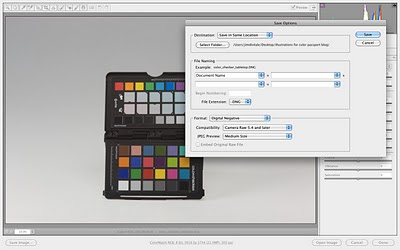
 Step two: Open the file in Adobe Camera Raw, and without doing any adjustments to the file of any kind, save the file as a DNG format file. The DNG is Adobe’s native Raw format that can be opened in both Photoshop and Lightroom.
 Step three: Open the X-Rite ColorChecker Passport software. Drag the saved DNG file into the open window of the ColorChecker Passport software. After about 5 to 10 seconds, the software finds the color chart and it appears in the open window with a green square around each of the color patches. The colors are analyzed, and like all other profiling procedures, it compares the actual measured values it’s reading against what they really should be. Next, click the “Create Profile” button in the bottom right corner of the dialog box to build the camera’s custom profile. The software uses the metadata from the file to extract the information about what model camera was used in the process and names the file automatically. The new profile is placed in both Photoshop and Lightroom and will be available for use after the software is restarted.
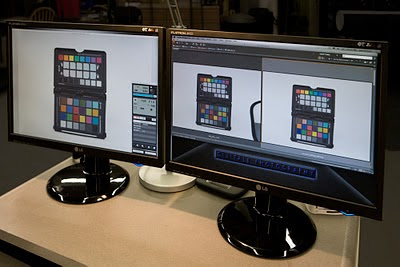
 Step four: Open any new Raw file shot under the same lighting conditions in either Photoshop’s Camera Raw or in Lightroom. Go to the Camera Calibration Tab and click on the Disclosure Triangle in the Camera Name field to pick the new profile and be ready to be amazed and the change of the file. By doing this you will find there are much fewer enhancements needed to process the file. At this point you can open the same file now click on a gray swatch with the White Balance Tool to apply a custom white balance to neutralize the color. You will find the relationships between all the colors on the chart are much better after this calibrating procedure. By clicking on any of the warmer or cooler gray swatches, you can cool and warm up the image to any color needed. Open additional files shot under the same lighting and apply the new custom profile to them. Repeat the profiling process for each different lighting condition as shooting under tungsten, sunshine or open shade will need a slightly different profile. Then process the enhancement control sliders as you normally would to finish up the procedure.
 You will find that that the file looks much better than before right from the start with much fewer adjustments. Finally, we now have the final piece of the closed loupe of color management made easy for us with repeatable and constant results for our future photography. For more information, go to http://www.xritephoto.com.
 Step one: First thing you need the X-Rite Color Checker Passport… It’s a $99 product you can buy at your local professional camera store. It comes with a CD that includes the profiling software to create a custom profile to be used in Adobe Photoshop and Lightroom. You start by shooting a photograph of the ColorChecker Passport target. Light the target evenly, have the white balance of the camera set for the type of lighting you are shooting, and try to get the best exposure you can of the target when making the exposure. Doing a custom white balance is unnecessary at this time, as the software will just ignore it anyway.
 Step two: Open the file in Adobe Camera Raw, and without doing any adjustments to the file of any kind, save the file as a DNG format file. The DNG is Adobe’s native Raw format that can be opened in both Photoshop and Lightroom.
 Step three: Open the X-Rite ColorChecker Passport software. Drag the saved DNG file into the open window of the ColorChecker Passport software. After about 5 to 10 seconds, the software finds the color chart and it appears in the open window with a green square around each of the color patches. The colors are analyzed, and like all other profiling procedures, it compares the actual measured values it’s reading against what they really should be. Next, click the “Create Profile” button in the bottom right corner of the dialog box to build the camera’s custom profile. The software uses the metadata from the file to extract the information about what model camera was used in the process and names the file automatically. The new profile is placed in both Photoshop and Lightroom and will be available for use after the software is restarted.
 Step four: Open any new Raw file shot under the same lighting conditions in either Photoshop’s Camera Raw or in Lightroom. Go to the Camera Calibration Tab and click on the Disclosure Triangle in the Camera Name field to pick the new profile and be ready to be amazed and the change of the file. By doing this you will find there are much fewer enhancements needed to process the file. At this point you can open the same file now click on a gray swatch with the White Balance Tool to apply a custom white balance to neutralize the color. You will find the relationships between all the colors on the chart are much better after this calibrating procedure. By clicking on any of the warmer or cooler gray swatches, you can cool and warm up the image to any color needed. Open additional files shot under the same lighting and apply the new custom profile to them. Repeat the profiling process for each different lighting condition as shooting under tungsten, sunshine or open shade will need a slightly different profile. Then process the enhancement control sliders as you normally would to finish up the procedure.
 You will find that that the file looks much better than before right from the start with much fewer adjustments. Finally, we now have the final piece of the closed loupe of color management made easy for us with repeatable and constant results for our future photography. For more information, go to http://www.xritephoto.com.
2 comments:
Always wondered how this worked. I really enjoy my out of camera processing but less CORRECTIONS are a bonus!
Thank you for a very concise and understandable post
Manny Giesteira
Very nice tutorial.Quite interesting and very easy way to create custom camera profile with using X Rite.
It really helped me alot.
Cheers
Rex
camera accessories
Post a Comment