February 12, 2009

Custom White Balance and Exposure

          There’s something that really drives me crazy with digital photography and Photoshop. Why is there so much emphasis on color correction? When did we all become such bad photographers where we have to spend so much time correcting color instead of shooting an image properly to start with? Want life to be better? I have three words for you today… Auto Is Evil… Now, three words that will make everything a lot better…. Custom White Balance…. Doing a custom white balance at the start of a photo shoot will save so much time on the computer that you will actually find time to be creative again, instead of being a color correcting technician…. I have worked with several different color charts over my 30 years in professional photography, and the one that I have found that works better than any other is the Photo Master Target developed by my good friend Jean-Francois O'Kane. I am not saying it because he is my friend… I didn’t even know him before discovering this tool that is part of my everyday workflow in or out of he studio. I met J F while Helene and I were teaching a weeklong workshop at the Niagara School in Canada. At first glance, it might seem like other targets you may have used before, but it’s not … Using this target has saved so much time for both Helene’s portrait photography and my commercial images in the studio and on location. Here’s how it works….
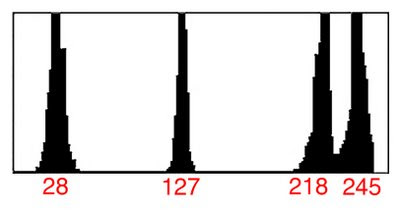
          The target has 4 patches of very neutral tones. They are created to give you a nice middle gray, and black with detail, a white with detail, and a forth tone of white that is slightly darker the white with detail patch.

        When starting a new photo shoot, you set the custom white balance by shooting a reflective image filling the frame with the middle gray patch, or shooing through the semi translucent white patch for an incident reading.
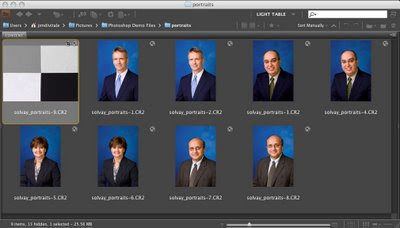
         Once the white balance is set, you then photograph the entire target filling the camera frame with all 4 patches that will give you a very unique histogram. What you are looking for is 4-peek histograms that will help you determine the proper highlight contrast. If you can get the two lighter peeks to have slight separation between them, you will have proper highlight contrast and exposure.

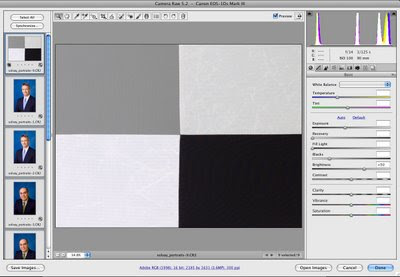
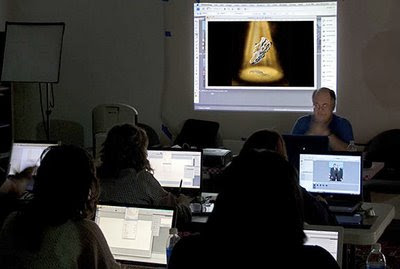
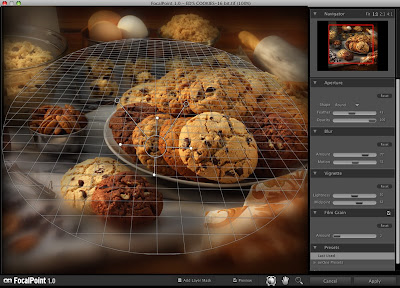
          When working with a group of images that are shot under the same lighting situation, you can open all of them up in Adobe Camera Raw or Lightroom and enhance the tonal range to all of them at once by adjusting the histogram of the target and applying the enhancement to all the files at once. This will save a great deal of processing time and help with consistency between all the files on the shoot. You can find out more information on the Photo Master Target at www.photomastertarget.com. You can use the discount code 68VT284 that J F has provided for all my readers. You won’t be disappointed.

January 31, 2009

The Targeted Adjustment Tool in Lightroom 2

        I would like to share this short video I made on using the Targeted Adjustment Tool in Adobe Lightroom 2. This tool gives us options in sliding around the tonal range of an image with ease. Double click the play icon below to enlarge video viewing size. Take a look and let me know what you think...

January 30, 2009

New Web Site Is Up


         I would like to introduce you to my new web site dedicated to my digital art photography. The site can be found at www.JimDiVitale.com. That address should be easy to remember. There are lots of new images I have never shown before along with many of my classic digital montages and paintings from my portfolio.

     
       From the splash page, you can launch into my fine art site in Flash (or HTML), or the DiVitale Photography commercial advertising site. I would love to have you take a look and pass along any comments to me as this new site takes shape. I am in the process of removing the remaining fine art image section from the main DiVitale Photography commercial web site to make room for a new portfolio section on  architecture and interiors. I am working on a project photographing historic homes in the Atlanta area for a new book, so I will have lots of new images to post there soon. I am doing this new project as Merge to HDR images with little to no extra lighting added to achieve a very natural environmental look to the images. It's a fun project that will take many days of location shooting over the next few months.... 

        I had a very busy time in Houston last week. Taught a 2 day hands-on class of 15 students with Steve Herzberg at PrairieFire Productions. We called it "Keep it Simple". We spent a lot of the time reviewing the best options for using digital imaging workflow tools.  The class followed along on their computers as we did step by step assignments together in Photoshop and Lightroom. I will be back in the Houston area a couple of times this coming year for more two day workshops.


        If you are not on Steve's mailing list for his newsletter, you can join at this address. Steve's newsletter goes out to over 45,000 subscribers and keeps you well informed on hot digital imaging products, topics, and techniques. Check it out at PrairieFire Productions.com. While I was in Houston, I did an Adobe presentation on What's new in Photoshop CS4 and Lightroom 2 for a packed house of ASMP photographers. I alway enjoy any time I get to work with any of the ASMP chapters around the US. 


A few hours after my return to Atlanta, I made yet another evening presentation on Compositing for Advertising illustrations in PS CS4 to the Adobe Users Group of Atlanta. I met lots of new friends there. Sseveral of them decided to take my Tune-Up Clinic Class the following Saturday at PPR Atlanta. We had twice as many attendees this time in our second of these monthly courses I am holding at PPR. We did a fast paced 4 hour class on Raw processing in both Photoshop and Lightroom. For more info on the next class go to PPRAtlanta.com    
        This week I have been working on series of magazine illustrations that had some nice Photoshop challenges. I will be posting a few things from that soon....  Got my case of print entries out to my first competition of this year at the Professional Photographers of California conference. Haven't competed in a while, so it was good to be working on that. We will see how well they do before the next round. Sorry for the delays in posting. With all this running around, I was out with a cold for few days and I am just now getting back to normal...  Till next time..   Have a great week...  Jimmy D... 

January 19, 2009

Creative Selective Focus with FocalPoint from OneOne Software

     Selective focus isn't a new technique, but there sure is a new way to apply it like never before with OnOne Software's FocalPoint. This Photoshop plug-in has the ability to give the photographer control like we have never had before. I still like my tilt-shift Canon 90 mm lens and my Lensbaby, but when I need very exacting control and all the possible options for my selective focus photography, this is where I turn to for creative effects. This way I can have my sharp images and my selective focus images from the same original Raw capture.  Best of all, I can pull images from my past and re-apply this plug-in to get a whole new look for my older images. This is a very simple to use Photoshop plug-in that has a unique dialog box for the control freak in all of us. Start by opening your file in Photoshop, and access the software plug-in from the OnOne drop down menu at the top of the screen.


     In the large dialog box you have a control called the Focus Bug which looks like a large grid across your image. In the center is a small circle with handles that come out. These handles control the amount and direction of the blur and vignette. Pressing the Option Key (PC: Alt Key) allows you to change the direction of the plane of focus to follow the natural fall off of the image. It's easy to learn in just a few minutes of playing around with a photo. The sliders on the right side of the dialog box also work in conjunction with the Focus Bug handles.


       You can save any adjustments you like as a preset to return to them later. Always remember to add just a little noise back to the blurry part of the image with the noise slider. An amount of about 2 to 4 on the slider should be enough to bring back the original grain of the image to match. The vignette slider can make the the edges darker or lighter if you are doing a high key image. This is a must have plug-in for you creative workflow and I am sure you will be having a lot of fun with it.....    Till next time....   Jimmy D....   

Imaging USA 2009


       Helene and I had a great time in Phoenix at Imaging USA. We got to see lots of friends and attend many classes. Many of our fellow Photoshop World instructors were there teaching, so we got to sit in on some classes that we never have time to see at the NAPP shows. Several of our close friends were receiving degrees this year so it was nice to be there with them for the awards ceremony. I received the Imaging Excellence Bar for a earning 13 additional PPA Loan collection merits over the last few years. I did two programs in the Canon Explorers of Light stage in the trade show to a nice sized crown of photographers. One program was on how to stitch panoramic images, and the second one was on shooting techniques using Merge to HDR and Extended Depth of Field. Arizona is a great place for these shows as the weather was perfect and the brand new convention center was very nice. Here are some photos from the show.....